If you’re using WordPress, Universal Analytics and the Yoast Analytics plugin, and want to set up Google Analytics ecommerce tracking manually, you’re probably running into some problems.
I had this exact scenario with a client’s website. We upgraded from Classic Analytics to Universal Analytics and immediately all ecommerce data stopped being recorded. Even though I have edited the ecommerce tracking code to the Universal Analytics required code.
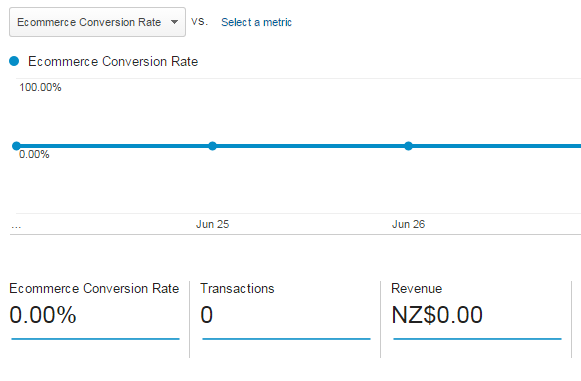
Analytics said no transactions, no sales, no quantity, no revenue .. the graph had flatlined. Sales were still coming in of course, but our Analytics data was not working.
The site was running in WordPress but wasn’t using WooCommerce or any other full shopping cart, so we couldn’t use the Yoast Ecommerce plugin (which works great!) The website just used simple Buy Now buttons and sent visitors to a thank you page where I had the ecommerce tracking code embedded.
After days of troubleshooting I finally found the problem, and it is specifically because of the Yoast plugin.
How to Fix Your Code
Universal Analytics documentation for Ecommerce Tracking shows the required code as
ga('require', 'ecommerce');
ga('ecommerce:addTransaction', { ...

ga('ecommerce:addItem', { ...

ga('ecommerce:send');
If you’ve been troubleshooting, like I was, you have gone over this code multiple times making sure it works.
However when using the Yoast Analytics plugin with Universal Analytics ticked, every ga needs to be changed to __gaTracker.
Like this:
__gaTracker('require', 'ecommerce');
__gaTracker('ecommerce:addTransaction', { ...

__gaTracker('ecommerce:addItem', { ...

__gaTracker('ecommerce:send');
As soon as this change was made, the ecommerce tr4ansactions were once again being successfully recorded in Google Analytics.
(As a side note – I use the awesome little plugin Global Content Blocks to embed my ecommerce tracking code on the page without the Wordpress editor messing it up).
Troubleshooting – How to See What Data is Being Sent to Google Analytics
Google have released a very useful Chrome extension that enables you to watch the data that is being sent to Google Analytics. It’s called the Google Analytics Debugger.
![]() When you add this extension to Chrome, the console in your developer tools will record all communication with Google Analytics. To test it, click the icon once in the toolbar to turn it “ON”, as the image shows.
When you add this extension to Chrome, the console in your developer tools will record all communication with Google Analytics. To test it, click the icon once in the toolbar to turn it “ON”, as the image shows.
Then go to your thank you or confirmation page, where you have the ecommerce tracking code embedded. Add the parameters to the URL, just like you do when a transaction is completed e.g. PayPal can be configured to send something like this:
?tx=ABCDEFGHIJKLMNOP&st=Completed&amt=50.00&cc=USD&cm=&item_number=2
When you load this page, open the developer tools (right-click > Inspect Element) and in the console section you’ll see all the details about what commands are being run for Google Analytics and what data is being sent.
(WARNING: When the code is working correctly this will send real data to your Google Analytics. So if you want accurate data refresh the page again after you see the data is working, otherwise you’ll end up with inflated sales figures in your Analytics).
Scroll through the data and look for the ecommerce commands being run. It will look like this:
![]()
If you don’t see the ecommerce lines, it means the ecommerce commands are not being run, and no data is being sent to Google Analytics. Once you see those lines in there, you can see exactly what data is being sent, and it will soon appear in Analytics for you.
If you’ve found this article useful, please leave a comment below.


